Introduction
I was inspired by Code and Data for the Social Sciences: A Practitioner’s Guide by Gentzkow and Shapiro to write a single script that executes all code from beginning to end.
For example, the paper I'm currently writing collates data using Python, cleans and analyses data using Stata, runs additional analyses with R and finally puts it all together in a paper using Latex.
These are all scripting languages, so it is simply a matter of running the correct files in the correct order.
Gentzkow and Shapiro propose to do this using batch files. This is nice, but it’s windows only. They note that Python would be a cross-platform solution, but do not give an example or instructions on how to do this. This post does exactly this.
A quick note on why this is useful (though for a more comprehensive description you should read Gentzkow and Shapiro’s excellent guide).
- You know exactly how a set of results can be recreated. If you have two cleaning files, it can be difficult to figure out which needs to be run first. You could add numbers or letters, or add a _manifest.txt file that gives suggestions on what order to do it in. However, these are suggestions, not instructions. If you do it in a different order, you might still get (different) results. What if you update your analysis process, but forget to update the manifest.txt file?
- It saves you time. Setting this up takes some time, but it pays off in the long run: every time you do a presentation or submit a paper you will run all your scripts paper from the top (you are doing this right!?) to make sure that you can reproduce the results. If your cleaning and analysis is in say 5 scripts, opening all these files up in the right order and running them will take a lot more time than just running one script.
A single script overcomes these problems because it cannot be ambiguous or out of date. It tells the reader, but also the computer exactly what needs to be done to recreate a set of results (or in my example, even a paper!).
So let’s get to automating! If you want to follow along, I've created a mock folder structure with example files in Python, R, Stata and Latex that will let you test if it's working on your machine. You can download it here. You can also clone it from my github repo here.
How this approach works is it uses a function in Python called “subprocess”, which is able to run other apps (R, Stata, etc). You need to know where these apps can be found. What makes this more difficult is that the version of the program you want is sometimes not the same you use in day to day work. So let’s find them.
Mac Setup:
To maximise cross-compatibility, we are going to make sure that each of the programs we use can be accessed with a keyword: the name of the executable or program. The method is as follows: we see if we can access the program through Terminal, the command line interface for your Mac. If we can’t, we’ll need to add the folder where the program is in to your “path”. This is a list of locations where your mac looks when you type a word in terminal. To do this, first go to your home directory. This is probably your user directory, “Paul” in my case. Then, hit shift+command+. (that’s a period). This will show you all the hidden files and folders in this directory (you can hit it again if you want to hide hidden folders and files again). If there is a file called “.profile”, click it and open it with a text editor. It’s probably not there though, in which case we’ll create one. Open a text editor and type
export PATH="$PATH"
All this is doing is saying that your path is equal to what your path already was: no changes. But now we can add extra locations by separating them with a ":" For example, say you’ve found that Rs location is at “/usr/local/Cellar/r/3.4.3_1/lib/R/bin”. Then you change the line to
export PATH="$PATH:/usr/local/Cellar/r/3.4.3_1/lib/R/bin:"
Then save this file in your home directory as ".profile" . That’s it! Source: https://coolestguidesontheplanet.com/add-shell-path-osx/ (WARNING: this guide refers to the .bash_profile, while we are working on the .profile. Apart from that the steps are similar.)
Python Setup
Open terminal and type “python”. I’m pretty sure this should always work. On a mac you won’t have to install Python 2.7: it comes preinstalled.
R Setup
Open terminal and type “Rscript”. If this gives a help message with some options you’re done! Otherwise, we’ll need to find the location and add it to the path:
As a scientist, you are likely using Rstudio. In Rstudio, type
R.home("bin")
In my case. that gives this location: "/usr/local/Cellar/r/3.4.3_1/lib/R/bin"
This is what we’ll need to add to the path.
Source: Stackoverflow
Latex Setup
Open terminal and type “pdflatex”. This should always work if you installed Latex through a standard distribution.
Stata Setup
We are not going to put Stata in the path since it’s not very useful (more on that below), but we still need to find the location. Navigate to the Applications folder in Finder, then open the Stata folder. Go to the Stata icon (the one you would normally click to open the content, but right-click it and choose “Show Package Contents”. Click Contents->MacOS. This folder should contain two executables: One with the same name as your Stata application (StataMP in my case), and one that’s in lowercase (stata-mp in my case). The location of this last one is what we need. In my case: “/Applications/Stata/StataMP.app/Contents/MacOS/stata-mp”. Specifically, this is the executable we need to run Stata in “Batch Mode”. This allows us to run Stata in the background without opening the program. You can check this by opening terminal and typing the location. Now you have Stata running in terminal!
Other Languages
I don’t use any other languages, but if you use a different one and have figured out how to run it from Python please let me know and I’ll add it here! Generally, you are looking for a way to run your program from terminal, or the command line. Googling your program with something like [program name] + [batch mode / shell mode / background mode] should work!
Windows Setup
To maximise cross-compatibility, we are going to make sure that each of the programs we use can be accessed with a keyword: the name of the executable or program. The method is as follows: we see if we can access the program through the command prompt (search for cmd in the start menu), the command line interface for your PC. If we can’t, we’ll need to add the folder where the program is in to your “path”. This is a list of locations where your PC looks for programs when you type a program name in the command prompt. To add to your path on windows, check out this link: https://superuser.com/questions/143119/how-do-i-add-python-to-the-windows-path. It’s pretty easy.
Python Setup
You first need to install Python: https://www.python.org/downloads/. I use version 2.7.8. After you’ve installed it, open command prompt and type “python”. If that doesn’t work, navigate to the folder where you have Python installed. In my case "C:/Python27", and add it to the path.
Latex Setup
Open Command Prompt and type “pdflatex”. If this doesn’t work, find out where Latex is installed in your program files folder and go several folders down. In my case, that is "C:/Program Files/MiKTeX 2.9/miktex/bin/x64".
R Setup
Open Command Prompt and type “Rscript”. If that doesn’t work, you probably have Rstudio installed. Open Rstudio and type R.home(“bin”). That’s the location we want to add to the path (it might be too short to copy over, in that case navigate to that location to copy the directory over).
Stata Setup
We are not going to put Stata in the path since it’s not very useful, but we still need to find the location. Navigate to where it is installed on your PC and copy the location, but also add the location of the executable. In my case: "C:/Program Files (x86)/Stata13/StataMP-64.exe". We’ll use this later.
Building the script
Now we can start making our script. My advice is to place this in the topmost level of your research folder. So if you use Dropbox, and your research project is in the folder "Awesome research project", place the file as such: “Dropbox/Awesome research project/rundirectory.py”. This allows you to easily call files in underlying folders. I suggest calling the python file “rundirectory.py” to make it clear what its purpose is.
The file follows a specific structure.
1. Setup.
2. Function definitions.
3. Running research scripts.
We’ll look at these in order
Setup
Remember the location for Stata we just found? This is where we declare it so Python knows where it program can be found. This will depend on which computer you are using. This also means that you will need to edit this each time you switch machines. With how Statacorp names its executables I think this is inevitable. Fortunately we only have to do this for Stata (so if you don’t use Stata you’re in luck!). What this looks like for me:
import os
import subprocess
import sys
import re
origWD = os.getcwd()

statalocwin="C:/Program Files (x86)/Stata13/StataMP-64.exe"
statalocmac="/Applications/Stata/StataMP.app/Contents/MacOS/stata-mp"
print("Wait for the message 'DONE' to show up. The Stata dofile run in the background so it might seem like the program is finished when it isn't")
The first line imports several Python modules (or programs) that we’ll need at later points in the file. We also get and save the original working directory, because we’ll be switching back and forth to it.
Next we declare the Stata locations we found, (notice how they are the same as what we found earlier). We don’t have to do this for Python, R and Latex because we have added all their locations to the path. Finally we print several messages to guide the user.
Function definitions
This is the important part. Here we declare several functions (one for each programming language) that python will run. Most of these are very simple, but it’s still important to declare them as functions to save lines and prevent ambiguity.
def parse_location(fileloc):
filepath = fileloc.split("/")
script = filepath[-1]
scriptdir = "/".join(filepath[0:-1])
return script, scriptdir
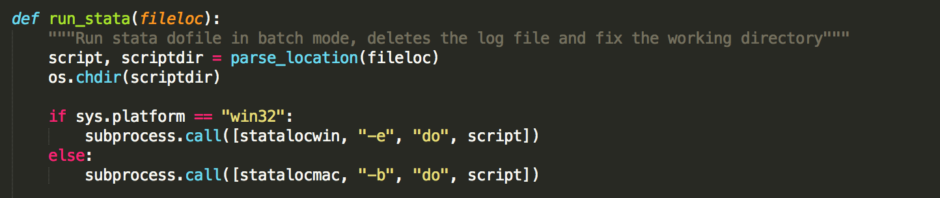
def run_stata(fileloc):
"""Run stata dofile in batch mode, deletes the log file and fix the working directory"""
script, scriptdir = parse_location(fileloc)
os.chdir(scriptdir)
if sys.platform == "win32":
subprocess.call([statalocwin, "-e", "do", script])
else:
subprocess.call([statalocmac, "-b", "do", script])
err=re.compile("^r\([0-9]+\);$")
with open("{}.log".format(script[0:-3]), 'r') as logfile:
for line in logfile:
if err.match(line):
print(lastline)
print(line)
sys.exit("Stata Error code {line} in {fileloc}".format(line=line[0:-2], fileloc=fileloc) )
lastline=line
os.remove("{}.log".format(script[0:-3]))
os.chdir(origWD)
def run_python(fileloc):
"""Run Python script and fix the working directory"""
script, scriptdir = parse_location(fileloc)
os.chdir(scriptdir)
subprocess.call(["python", script])
os.chdir(origWD)
def run_R(fileloc):
"""Run R script and fix the working directory"""
script, scriptdir = parse_location(fileloc)
os.chdir(scriptdir)
subprocess.call(["Rscript", "--vanilla", script])
os.chdir(origWD)
def run_latex(fileloc):
"""Run a Tex script, run bibtex and then the Tex script twice more. Then fix the working directory"""
script, scriptdir = parse_location(fileloc)
os.chdir(scriptdir)
subprocess.call(["pdflatex", script])
subprocess.call(["bibtex", script[0:-4] ])
subprocess.call(["pdflatex", script])
subprocess.call(["pdflatex", script])
os.chdir(origWD)
The first function, parse_location is a general function. It takes the location of a script and splits it out into two parts: the actual name of the script, and the location where it is. So it will take a location ("01_Data/01_Raw/merge.py") and split this out into the directory("01_Data/01_Raw“) and the filename (“merge.py”). We need to do this because running a file consists of three steps: Changing the directory to the location of the file, running the file, and changing the directory back. We need to change the working directory because that ensures that the script will work the same as if it is run individually.
The second function, run_stata runs a stata dofile. First we take the location of the file, and split it into the directory and the filename using the function we just wrote. Then we change the working directory to the location of the file. Next we check what OS we are on. In Windows Stata’s batch mode has different options, so we need to adapt the command based on the OS. Next, we run the actual file: ‘subprocess.call’ is the function in Python to run an external program.. Let’s look in detail at the details we give to this function: statalocwin, “-e”, "do", script. statalocwin is the variable where we saved the location of the windows version of Stata. The next option "-e", tells Stata that we want something run in Batch mode, and we want to suppress all confirmation messages. This ensures the program runs without our input. "do" tells stata we want to run a dofile. Finally, we add the name of the dofile we want to run. The subprocess.call function wants all these commands separately as a list, which is why it’s enclosed in square brackets with commas in between. On the mac we use the option "-b" instead of "-e", because the -e option is not allowed on mac. The results are the same. After the file has finished running we open the logfile to confirm that there were no errors in executing the stata file. If there are any, the program terminates and you will be notified of the error. I don't see the point of keeping the logfile around after that, so we delete it. Finally, we change the working directory back to the original working directory, and we are done!
The other three functions are similar and structure and even simpler, so I’ll describe them at once. Once again we first split the location in the directory and the script name. We change the working directory to the script directory. Then we run the script, again using the subprocess.call function. For R we need an extra option “—vanilla”, this makes sure that R does not save workspace images, does not try to restore the session and does not use several user presets. For Latex we need to run several commands: first Latex, then Bibtex and then Latex twice. This is the only way that Latex gets all the references/citations right.
Running research scripts
Now that we have all the setup done, it’s simply a matter of declaring the order we want these files to be run in (Figuring this out can be tough as well, so I suggest having a script like this from the start and continually update it).
run_python("01_Data/01_Raw/merge.py")

run_R("01_Data/02_Clean/graphing.r")

run_stata("01_Data/02_Clean/analysis.do")

run_latex("03_Paper/Paper.tex")
print(“DONE”)
This is a simplified example, but it shows how nice this ends up looking. For each script you have one line, and it shows the exact location of each file (relative to rundirectory.py). I like to end with a print statement but it’s totally optional. Most editors will tell you at the end how long a script has run as a closing.
And that’s it! Some remarks:
- There are some cross-platform differences between Stata, even between the console version (which this program uses) and the GUI version (which you usually use). Specifically: the console Stata for UNIX (so Mac and Linux) can't export images to .png, .pdf and .tif. This is really annoying but the only solution is to export your images to .eps instead. One advantage: the image files will be smaller and higher quality (.eps files are vector-based).
- I had some difficulties with spaces in file names, especially with stata dofiles. My suggestion: never put spaces in file names.
- A nice text editor helps with working in Python and other scripting languages. Sublime text worked great for me. I’ve heard good things about Notepad++ and Atom as well. I also use Textmate, but I couldn’t get it to work with the subprocess command.
- Use forward slashes for all location definitions. That ensures it can also be run on Macs if you use Windows. It’s a good habit in general since markdown and Latex use it for special commands.
- When switching machines, you’ll likely get some errors that are a bit unhelpful (e.g. cannot find the path specified). The way to troubleshoot this is to run the scripts individually. In my case this meant that some functions were not installed properly: I needed to install some R packages.